Monday, September 11, 2017

Date Formatting / Date Conversion in Java / Android

Date Formatting is frequently used in programming and it is like headache for developers to format date to store into database and to display for users. Sometimes, app is crashed due to wrong date formatting. Here, I have give you best example of some different Date formats and get different Date Range.

First of all, Make new Java Class, name it Utils.java and copy below code into it.
DB_DATE_FORMAT and DISPLAY_DATE_FORMAT are different date formats and we can convert date from one format to another. You can use your own date format as well. To do this you just need to change 2 strings of date formats.

1. Display Date Format(): This method is convert date from DB_DATE_FORMAT to DISPLAY_DATE_FORMAT. Make sure your input in dtOldFormat is exact same as DB_DATE_FORMAT. Otherwise, it will throw an exception.

2. getLast7Days(): It will give you last 7 days list including todays date. Pair<String,String> function stores first and last date of range.

3. getPreviousMonth(): same as above, it will return Previous month's first and last date.

4. getSameMonthLastYear(): As name suggested it will give you same month date for previous month.

5. getCurrentMonthDateRange(): will give you current month date range

Other Private methods are used to set current calendar date and time for use of this class only.


public class Utils {

    public String DB_DATE_FORMAT = "yyyy-MM-dd";
    public String DISPLAY_DATE_FORMAT = "dd MMM yyyy";
    
    public String displayDateFormat(String dtOldFormat) {
        try {
            DateFormat inputFormat = new SimpleDateFormat(DB_DATE_FORMAT);
            DateFormat outputFormat = new SimpleDateFormat(DISPLAY_DATE_FORMAT);
            Date date = inputFormat.parse(dtOldFormat);
            String outputDateStr = outputFormat.format(date);
            return outputDateStr;
        } catch (Exception e) {
            e.printStackTrace();
            return dtOldFormat;
        }
    }

    public Pair<String,String> getLast7Days(){
        String begining,ending;
        Calendar cal = Calendar.getInstance();
        SimpleDateFormat sdf = new SimpleDateFormat(DB_DATE_FORMAT);
        ending = sdf.format(cal.getTime());
        cal.set(Calendar.DAY_OF_WEEK, cal.getFirstDayOfWeek());
        cal.add(Calendar.DAY_OF_WEEK, -6);
        begining = sdf.format(cal.getTime());
        return Pair.create(begining,ending);
    }

    public Pair<String, String> getPreviousMonth(){
        Date begining, end;

        Calendar calendar = GregorianCalendar.getInstance();
        calendar.add(Calendar.MONTH,-1);
        {
            calendar.set(Calendar.DAY_OF_MONTH,
                    calendar.getActualMinimum(Calendar.DAY_OF_MONTH));
            setTimeToBeginningOfDay(calendar);
            begining = calendar.getTime();
        }

        {
            calendar.set(Calendar.DAY_OF_MONTH,
                    calendar.getActualMaximum(Calendar.DAY_OF_MONTH));
            setTimeToEndofDay(calendar);
            end = calendar.getTime();
        }

        DateFormat inputFormat = new SimpleDateFormat(DB_DATE_FORMAT);
        return android.util.Pair.create(inputFormat.format(begining),inputFormat.format(end));
    }

    public Pair<String, String> getSameMonthLastYear(){
        Date begining, end;

        Calendar calendar = GregorianCalendar.getInstance();
        calendar.add(Calendar.YEAR,-1);
        {
            calendar.set(Calendar.DAY_OF_MONTH,
                    calendar.getActualMinimum(Calendar.DAY_OF_MONTH));
            setTimeToBeginningOfDay(calendar);
            begining = calendar.getTime();
        }

        {
            calendar.set(Calendar.DAY_OF_MONTH,
                    calendar.getActualMaximum(Calendar.DAY_OF_MONTH));
            setTimeToEndofDay(calendar);
            end = calendar.getTime();
        }

        DateFormat inputFormat = new SimpleDateFormat(DB_DATE_FORMAT);
        return android.util.Pair.create(inputFormat.format(begining),inputFormat.format(end));
    }
    public android.util.Pair<String, String> getCurrentMonthDateRange() {
        Date begining, end;

        {
            Calendar calendar = getCalendarForNow();
            calendar.set(Calendar.DAY_OF_MONTH,
                    calendar.getActualMinimum(Calendar.DAY_OF_MONTH));
            setTimeToBeginningOfDay(calendar);
            begining = calendar.getTime();
        }

        {
            Calendar calendar = getCalendarForNow();
            calendar.set(Calendar.DAY_OF_MONTH,
                    calendar.getActualMaximum(Calendar.DAY_OF_MONTH));
            setTimeToEndofDay(calendar);
            end = calendar.getTime();
        }

        DateFormat inputFormat = new SimpleDateFormat(DB_DATE_FORMAT);
        return android.util.Pair.create(inputFormat.format(begining),inputFormat.format(end));

    }
    private static Calendar getCalendarForNow() {
        Calendar calendar = GregorianCalendar.getInstance();
        calendar.setTime(new Date());
        return calendar;
    }

    private static void setTimeToBeginningOfDay(Calendar calendar) {
        calendar.set(Calendar.HOUR_OF_DAY, 0);
        calendar.set(Calendar.MINUTE, 0);
        calendar.set(Calendar.SECOND, 0);
        calendar.set(Calendar.MILLISECOND, 0);
    }

    private static void setTimeToEndofDay(Calendar calendar) {
        calendar.set(Calendar.HOUR_OF_DAY, 23);
        calendar.set(Calendar.MINUTE, 59);
        calendar.set(Calendar.SECOND, 59);
        calendar.set(Calendar.MILLISECOND, 999);
    }
}

Wednesday, November 18, 2015

Play Audio From Asset Directory in Android


Description:

Many applications need small audio file integrated in app only. For Example, Simple 2D bomb blast game, it requires bomb blast sound effect. It is necessary for developer to add sound effect in this type of app.Another reason is make application more attractive. Sound effect shapes your app more attractive and look different than other apps. Here is the code which help you to play audio file from asset file.

We have created this app with very easy way, you can use the same file for different application with copy/paste file.

First, Create AudioPlayer.java file:

AudioPlayer.java


import java.io.IOException;

import android.content.Context;
import android.content.res.AssetFileDescriptor;
import android.media.MediaPlayer;

public class AudioPlayer {

String fileName;
   Context contex;
   MediaPlayer mp;

   //Constructor
   public AudioPlayer(String name, Context context) {
       fileName = name;
       contex = context;
      // playAudio();
   }

   //Play Audio
   public void playAudio() {
       mp = new MediaPlayer();
       try {
           AssetFileDescriptor descriptor = contex.getAssets()
                   .openFd(fileName);
           mp.setDataSource(descriptor.getFileDescriptor(),
                   descriptor.getStartOffset(), descriptor.getLength());
           descriptor.close();
           mp.prepare();
           mp.setLooping(true);
           mp.start();
           mp.setVolume(3, 3);

       } catch (IllegalArgumentException e) {
           e.printStackTrace();
       } catch (IllegalStateException e) {
           e.printStackTrace();
       } catch (IOException e) {
           e.printStackTrace();
       }
   }
   //Stop Audio
   public void stop() {
    if(mp != null){
       mp.stop();
    }
   }
   
   //Pause Audio
   public void pause(){
    if(mp != null){
    mp.pause();
    }
   }
   
}

Now, Add 3 Buttons Play,Pause and Stop in activity_main.xml file.

activity_main.xml


<RelativeLayout xmlns:android="http://schemas.android.com/apk/res/android"
    xmlns:tools="http://schemas.android.com/tools"
    android:layout_width="match_parent"
    android:layout_height="match_parent"
    tools:context="${relativePackage}.${activityClass}" >

    <LinearLayout
        android:layout_width="wrap_content"
        android:layout_height="wrap_content"
        android:layout_centerHorizontal="true"
        android:layout_centerVertical="true"
        android:orientation="vertical" >

        <Button
            android:id="@+id/buttonPlay"
            android:layout_width="match_parent"
            android:layout_height="wrap_content"
            android:text="Play"
            android:drawableLeft="@android:drawable/ic_media_play" />

        <Button
            android:id="@+id/buttonPause"
            android:layout_width="match_parent"
            android:layout_height="wrap_content"
            android:text="Pause"
            android:drawableLeft="@android:drawable/ic_media_pause" />

        <Button
            android:id="@+id/buttonStop"
            android:layout_width="match_parent"
            android:layout_height="wrap_content"
            android:text="Stop"
            android:drawableLeft="@drawable/stop" />

    </LinearLayout>

</RelativeLayout>


Copy below code in MainActivity.java file

MainActivity.java


import android.app.Activity;
import android.content.Context;
import android.os.Bundle;
import android.view.View;
import android.view.View.OnClickListener;
import android.widget.Button;

public class MainActivity extends Activity {

Button btnPlay, btnPause, btnStop;
AudioPlayer audioPlayer;
Context context;

@Override
protected void onCreate(Bundle savedInstanceState) {
super.onCreate(savedInstanceState);
setContentView(R.layout.activity_main);

btnPlay = (Button) findViewById(R.id.buttonPlay);
btnPause = (Button) findViewById(R.id.buttonPause);
btnStop = (Button) findViewById(R.id.buttonStop);

context = getApplicationContext();
audioPlayer = new AudioPlayer("audio_sample.mp3", context);

btnPlay.setOnClickListener(new OnClickListener() {
public void onClick(View v) {
audioPlayer.playAudio();
btnPlay.setEnabled(false);
}
});

btnPause.setOnClickListener(new OnClickListener() {
public void onClick(View v) {
btnPlay.setEnabled(true);
if (audioPlayer != null) {
audioPlayer.pause();
}
}
});

btnStop.setOnClickListener(new OnClickListener() {
public void onClick(View v) {
btnPlay.setEnabled(true);
if (audioPlayer != null) {
audioPlayer.stop();
}
}
});
}
}


Download Full Source Code: GitHub


Tuesday, November 17, 2015

Session Time Out Android Demo Application


Description:

Android application which has Login/Logout functionality , They need this type of functionality. In Web / Java Applications Session Time out is given by default but in android there is no default functionality like this.

Here is the example, in which go to next screen and keep screen un-touch for 30 sec. It will show you session time out to alert and when you press "ok" button it will redirect to previous screen.

Here is the full source code:

activity_main.xml


<LinearLayout xmlns:android="http://schemas.android.com/apk/res/android"
    xmlns:tools="http://schemas.android.com/tools"
    android:layout_width="fill_parent"
    android:layout_height="fill_parent"
    android:orientation="vertical"
    android:padding="10dp" >

     <ImageView
        android:id="@+id/imageView1"
        android:layout_width="wrap_content"
        android:layout_height="wrap_content"
        android:padding="40dp"
        android:layout_weight="1"
        android:src="@drawable/logo" />
     
    <TextView
        android:id="@+id/textView1"
        android:layout_width="fill_parent"
        android:layout_height="wrap_content"
        android:textAlignment="center"
        android:text="Go To next screen and hold for 30 sec. It will automatically give you session timeout warning and redirect this page again."
        android:layout_marginBottom="10dp"
        android:textSize="22dp" />

     <Button
        android:id="@+id/buttonNextScreen"
        android:layout_width="wrap_content"
        android:layout_height="wrap_content"
        android:layout_gravity="center"
        android:text="Go To Next Screen" />
   
</LinearLayout>

MainActivity.java


import android.app.Activity;
import android.content.Intent;
import android.os.Bundle;
import android.view.View;
import android.view.View.OnClickListener;
import android.widget.Button;

public class MainActivity extends Activity {

Button btnGoToNext;
@Override
protected void onCreate(Bundle savedInstanceState) {
super.onCreate(savedInstanceState);
setContentView(R.layout.activity_main);
btnGoToNext = (Button) findViewById(R.id.buttonNextScreen);
btnGoToNext.setOnClickListener(new OnClickListener() {
public void onClick(View v) {
Intent intent = new Intent(MainActivity.this, SecondActivity.class);
startActivity(intent);
}
});
}
}


Now, Create another Activity called SecondActivity.java


activity_second.xml


<RelativeLayout xmlns:android="http://schemas.android.com/apk/res/android"
    xmlns:tools="http://schemas.android.com/tools"
    android:layout_width="match_parent"
    android:layout_height="match_parent"
    tools:context="${relativePackage}.${activityClass}" >

    <TextView
        android:layout_width="wrap_content"
        android:layout_height="wrap_content"
        android:layout_centerHorizontal="true"
        android:layout_centerVertical="true"
        android:textSize="22dp"
        android:padding="10dp"
        android:textAlignment="center"
        android:text="Keep untouch this screen for 30 sec. It will show dialog box." />

</RelativeLayout>


SecondActivity.java


import android.os.Bundle;

public class SecondActivity extends MyBaseActivity {

@Override
protected void onCreate(Bundle savedInstanceState) {
super.onCreate(savedInstanceState);
setContentView(R.layout.activity_second);
}
}


Main thing is, In which screen / Activity you want to add session timeout , you need to implement "MyBaseActivity" instead of "Activity".


MyBaseActivity.java


import android.app.Activity;
import android.app.AlertDialog;
import android.content.DialogInterface;
import android.content.Intent;
import android.os.Handler;
import android.os.Message;

public class MyBaseActivity extends Activity {

public static final long DISCONNECT_TIMEOUT = 30000; // 30 sec = 30 * 1000 ms

private Handler disconnectHandler = new Handler() {
public void handleMessage(Message msg) {
}
};

private Runnable disconnectCallback = new Runnable() {
@Override
public void run() {

AlertDialog.Builder alertDialog = new AlertDialog.Builder(
MyBaseActivity.this);
alertDialog.setCancelable(false);
alertDialog.setTitle("Alert");
alertDialog
.setMessage("Session Timeout, Hit ok to go to previous screen.");
alertDialog.setNegativeButton("OK",
new DialogInterface.OnClickListener() {

public void onClick(DialogInterface dialog, int which) {
Intent intent = new Intent(MyBaseActivity.this,
MainActivity.class);
intent.setFlags(Intent.FLAG_ACTIVITY_CLEAR_TASK
| Intent.FLAG_ACTIVITY_CLEAR_TOP);
startActivity(intent);

dialog.cancel();
}
});

alertDialog.show();

// Perform any required operation on disconnect
}
};

public void resetDisconnectTimer() {
disconnectHandler.removeCallbacks(disconnectCallback);
disconnectHandler.postDelayed(disconnectCallback, DISCONNECT_TIMEOUT);
}

public void stopDisconnectTimer() {
disconnectHandler.removeCallbacks(disconnectCallback);
}

@Override
public void onUserInteraction() {
resetDisconnectTimer();
}

@Override
public void onResume() {
super.onResume();
resetDisconnectTimer();
}

@Override
public void onStop() {
super.onStop();
stopDisconnectTimer();
}
}


AndroidMenifest.xml


<?xml version="1.0" encoding="utf-8"?>
<manifest xmlns:android="http://schemas.android.com/apk/res/android"
    package="session.time.out"
    android:versionCode="1"
    android:versionName="1.0" >

    <uses-sdk
        android:minSdkVersion="8"
        android:targetSdkVersion="21" />

    <application
        android:allowBackup="true"
        android:icon="@drawable/ic_launcher"
        android:label="@string/app_name"
        android:theme="@style/AppTheme" >
        <activity
            android:name=".MainActivity"
            android:label="@string/app_name" >
            <intent-filter>
                <action android:name="android.intent.action.MAIN" />

                <category android:name="android.intent.category.LAUNCHER" />
            </intent-filter>
        </activity>
        <activity
            android:name=".SecondActivity"
            android:label="@string/title_activity_second" >
        </activity>
    </application>

</manifest>


Download Full Source Code: GitHub


Monday, November 16, 2015

Text Highlighter Android Demo


Description:

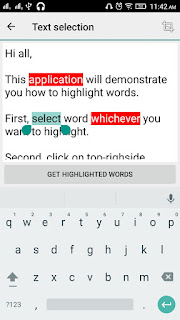
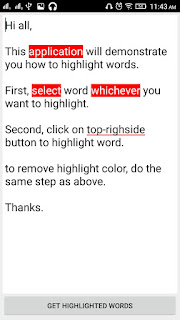
If you are developing text / notepad app, you should give user to highlight words.Here is the demo app which helps you to fulfill this function.

In this app, We have use one custom class to store word's starting and ending position and word in ArrayList. It will help you to get highlighted words globally.

PS: If user select already highlighted word then you have to de-Highlight that word. We also has to remove it from ArrayList.

Here is the step by step code to do this.

First, add below code to activity_main.xml file for layout.


activity_main.xml


<LinearLayout xmlns:android="http://schemas.android.com/apk/res/android"
    xmlns:fab="http://schemas.android.com/apk/res-auto"
    android:layout_width="fill_parent"
    android:layout_height="fill_parent"
    android:layout_weight="0.4"
    android:orientation="vertical"
    android:padding="5dip" >

    <EditText
        android:id="@+id/note"
        android:layout_width="fill_parent"
        android:layout_height="fill_parent"
        android:layout_weight="1"
        android:autoText="false"
        android:background="@android:color/white"
        android:capitalize="none"
        android:ems="10"
        android:fadingEdge="none"
        android:gravity="top"
        android:padding="5dp"
        android:hint="Enter text here..."
        android:scrollbars="vertical|horizontal"
        android:textColor="@android:color/black"
        android:textSize="22dp" >

        <requestFocus />
    </EditText>

    <Button
        android:id="@+id/btnGetHighlightedWords"
        android:layout_width="fill_parent"
        android:layout_height="wrap_content"
        android:text="Get Highlighted Words" />
    
</LinearLayout>

Create custom class named SelectedWordPOJO and add below code into it.

SelectedWordPOJO.java

public class SelectedWordPOJO {

String word;
int start;
int end;

public SelectedWordPOJO(String word, int start, int end){
this.word = word;
this.start = start;
this.end = end;
}

public String getWord() {
return word;
}

public void setWord(String word) {
this.word = word;
}

public int getStart() {
return start;
}

public void setStart(int start) {
this.start = start;
}

public int getEnd() {
return end;
}

public void setEnd(int end) {
this.end = end;
}

}

Now Go to MainActivity.java class and ad below code:

MainActivity.java


import java.util.ArrayList;

import android.app.Activity;
import android.graphics.Color;
import android.os.Bundle;
import android.text.SpannableStringBuilder;
import android.text.style.BackgroundColorSpan;
import android.text.style.ForegroundColorSpan;
import android.util.Log;
import android.view.ActionMode;
import android.view.Menu;
import android.view.MenuInflater;
import android.view.MenuItem;
import android.view.View;
import android.view.View.OnClickListener;
import android.widget.Button;
import android.widget.EditText;

public class MainActivity extends Activity {

EditText etText;
ArrayList<SelectedWordPOJO> selectedWordsCounter = new ArrayList<SelectedWordPOJO>();
Button btnGetHighlightedWords;
@Override
protected void onCreate(Bundle savedInstanceState) {
super.onCreate(savedInstanceState);
setContentView(R.layout.activity_main);

etText = (EditText) findViewById(R.id.note);
etText.setCustomSelectionActionModeCallback(new StyleCallBack());
etText.setVerticalScrollBarEnabled(true);
etText.requestFocus();

btnGetHighlightedWords = (Button) findViewById(R.id.btnGetHighlightedWords);

btnGetHighlightedWords.setOnClickListener(new OnClickListener() {
public void onClick(View v) {
StringBuffer sb = new StringBuffer();
for(int i = 0 ; i< selectedWordsCounter.size() ; i++){
sb.append(selectedWordsCounter.get(i).word+",\n");
}
etText.setText("Highlighted Words:\n\n"+sb.toString());
}
});

}

class StyleCallBack implements ActionMode.Callback {

public boolean onCreateActionMode(ActionMode mode, Menu menu) {
MenuInflater inflater = mode.getMenuInflater();
inflater.inflate(R.menu.style, menu);
menu.removeItem(android.R.id.selectAll);
menu.removeItem(android.R.id.copy);
menu.removeItem(android.R.id.cut);
return true;
}

public boolean onPrepareActionMode(ActionMode mode, Menu menu) {
return false;
}

public boolean onActionItemClicked(ActionMode mode, MenuItem item) {
int start = etText.getSelectionStart();
int end = etText.getSelectionEnd();

SpannableStringBuilder ssb = new SpannableStringBuilder(etText.getText());
final ForegroundColorSpan foreGroundWhite = new ForegroundColorSpan(Color.WHITE); 
final BackgroundColorSpan backgroundRed = new BackgroundColorSpan(Color.RED);
// final CharacterStyle csBold = new StyleSpan(Typeface.BOLD);

final ForegroundColorSpan foreGroundBlack = new ForegroundColorSpan(Color.BLACK); 
final BackgroundColorSpan backgroundWhite = new BackgroundColorSpan(Color.WHITE);
// final CharacterStyle csNormal = new StyleSpan(Typeface.NORMAL);

switch (item.getItemId()) {
case R.id.more:

final CharSequence selectedText = etText.getText().subSequence(start, end);
boolean b = checkWordStorage(selectedText.toString(), start, end);
if(b){
// DESELECT
       ssb.setSpan(backgroundWhite, start, end, 1);
//    ssb.setSpan(csNormal, start, end, 1);
           ssb.setSpan(foreGroundBlack, start, end, 1);
           Log.v("Start:"+start,"End:"+end);
           etText.setText(ssb);

}else{
//SELECT
   ssb.setSpan(backgroundRed, start, end, 1);
 //  ssb.setSpan(csBold, start, end, 1);
           ssb.setSpan(foreGroundWhite, start, end, 1);
           Log.v("Start:"+start,"End:"+end);
           etText.setText(ssb);
}
           return true;
}
return false;
}

public void onDestroyActionMode(ActionMode mode) {
}
}

private boolean checkWordStorage(String word, int st, int end){
boolean result = false;
for(int i = 0 ; i < selectedWordsCounter.size() ; i++){
int eachStart = selectedWordsCounter.get(i).getStart();
int eachEnd = selectedWordsCounter.get(i).getEnd();
String eachWord = selectedWordsCounter.get(i).getWord();
 
if(word.equals(eachWord) && st == eachStart && end == eachEnd){
// word is already exist and need to DESELECT
selectedWordsCounter.remove(i);
result = true;
break;
}
}
 
if(!result){
// word is not found in array, We need to add it in array  
selectedWordsCounter.add(new SelectedWordPOJO(word, st, end));
}
 
return result;
}
 
}

In Above code, We uses StyleCallBack method which handles styleActionBar. Comment below code, If you want to give feature of cut,copy,paste text.

menu.removeItem(android.R.id.selectAll);
menu.removeItem(android.R.id.copy);
menu.removeItem(android.R.id.cut);

This StyleCallBack method will identify whether selected word is already exist in ArrayList or not. If it is already available then it will remove it from arraylist and also remove red highlight color. If it is not exist then it will add it in arraylist and highlight word with Red color.

Last, You have to create one menu file in /res/menu/ directory named style.xml and add below code into it.

style.xml

<?xml version="1.0" encoding="utf-8"?>
<menu xmlns:android="http://schemas.android.com/apk/res/android" >

    <item
        android:id="@+id/more"
        android:enabled="true"
        android:icon="@android:drawable/ic_menu_crop"
        android:showAsAction="always"
        android:title="More"
        android:visible="true"/>
    
</menu>

PS: Don't forget to set minSDKVersion to 11 as StyleCallBack method supports min 11 or greater.


Download Full Source Code: GitHub